卷积神经网络(CNN)学习算法之----基于LeNet网络的中文验证码识别
由于公司需要进行了中文验证码的图片识别开发,最近一段时间刚忙完上线,好不容易闲下来就继上篇《基于Windows10 x64+visual Studio2013+Python2.7.12环境下的Caffe配置学习 》文章,记录下利用caffe进行中文验证码图片识别的开发过程。由于这里主要介绍开发和实现过程,CNN理论性的东西这里作为介绍的重点,遇到相关的概念和术语请自行研究。目前从我们训练出来的模型来看,单字识别率接近96%,所以一个四字验证码的准确率大概80%,效果还不错,完全能满足使用,如果每张图片的样本继续加大应该能取得更高的准确率,当然随着样本的加大,训练时间也随之增大,对硬件设备要求也越高,还有就是优化LeNet网络结构,目前这里只使用了三层卷积。
(一)开发准备
(1)开发环境
软件环境:visual Studio2013+Python2.7.12+caffe
硬件环境:Intel Core i7-4790+GTX1080+RAM32G
(2)训练图片
可以用于验证码的中文常用字大概3666个,每个字的训练大于等于50个,所以总共训练样本大概20万,其中80%用于训练集,20%用于测试集。样本收集是一个非常麻烦和耗时的过程,需要手工标注结果,我这里利用手工打码平台收集,最便宜一个验证码要4分钱,可以大概算一下,光为了收集这么多样本就将近花费1万RMB,还有配置一个GTX1080的显卡大概6千RMB,这点成本对一个公司还好,如果是对于个人投入还是不少,所以对于实验室的学生党玩深度学习成本还是蛮高的!
训练集:26万样本图片
测试集:13万样本图片
(二)图片样本处理
目前验证码种类无极繁多,有数字、字母、中文、图片等等,不过本文主要介绍中文验证码的识别。中文验证码设计干扰的方式主要围绕:
(1)背景色干扰
(2)文字倾斜扭曲
(3)干扰性
(4)中文拼音并存(百度九宫格)
(5)叠字
针对不同类型的验证码需要分别处理,这些处理过程统称图片预处理,目前并没有统一的预处理方式,需要针对不同的验证码做特殊处理,但是大体不过程无外乎:灰度化、二值化、去干扰线、分割切图、标准化,这些过程用python实现都非常的简单,这里就不详细介绍了,直接上代码,需要import cv2:


 1 class PreProcess(object):
 2     """description of class"""
 3     def ConvertToGray(self,Image,filename):
 4         GrayImage=cv2.cvtColor(Image,cv2.COLOR_BGR2GRAY)
 5         return GrayImage
 6
 7     def ConvertTo1Bpp(self,GrayImage,filename):
 8       Bpp=cv2.threshold(GrayImage,127,255,cv2.THRESH_BINARY)
 9         cv2.imwrite(‘D://‘+‘1.jpg‘,Bpp[1])
10         return Bpp
11
12     def InterferLine(self,Bpp,filename):
13         for i in range(0,76):
14             for j in range(0,Bpp.shape[0]):
15                 Bpp[j][i]=255
16         for i in range(161,Bpp.shape[1]):
17             for j in range(0,Bpp.shape[0]):
18                 Bpp[j][i]=255
19         m=1
20         n=1
21         for i in range(76,161):
22             while(m<Bpp.shape[0]-1):
23                 if Bpp[m][i]==0:
24                     if Bpp[m+1][i]==0:
25                         n=m+1
26                     elif m>0 and Bpp[m-1][i]==0:
27                         n=m
28                         m=n-1
29                     else:
30                         n=m+1
31                     break
32                 elif m!=Bpp.shape[0]:
33                     l=0
34                     k=0
35                     ll=m
36                     kk=m
37                     while(ll>0):
38                         if Bpp[ll][i]==0:
39                             ll=11-1
40                             l=l+1
41                         else:
42                             break
43                     while(kk>0):
44                         if Bpp[kk][i]==0:
45                             kk=kk-1
46                             k=k+1
47                         else:
48                             break
49                     if (l<=k and l!=0) or (k==0 and l!=0):
50                         m=m-1
51                     else:
52                         m=m+1
53                 else:
54                     break
55                 #endif
56             #endwhile
57             if m>0 and Bpp[m-1][i]==0 and Bpp[n-1][i]==0:
58                 continue
59             else:
60                 Bpp[m][i]=255
61                 Bpp[n][i]=255
62             #endif
63         #endfor
64         return Bpp
65
66     def CutImage(self,Bpp,filename):
67         b1=np.zeros((Bpp.shape[0],20))
68         for i in range(78,98):
69             for j in range(0,Bpp.shape[0]):
70                 b1[j][i-78]=Bpp[j][i]
71         cv2.imwrite(outpath+filename.decode(‘gbk‘)[0].encode(‘gbk‘)+‘_‘+‘%d‘ %(time.time()*1000)+str(random.randint(1000,9999))+‘.png‘,b1)
72
73         b2=np.zeros((Bpp.shape[0],19))
74         for i in range(99,118):
75             for j in range(0,Bpp.shape[0]):
76                 b2[j][i-99]=Bpp[j][i]
77         cv2.imwrite(outpath+filename.decode(‘gbk‘)[1].encode(‘gbk‘)+‘_‘+‘%d‘ %(time.time()*1000)+str(random.randint(1000,9999))+‘.png‘,b2)
78
79         b3=np.zeros((Bpp.shape[0],19))
80         for i in range(119,138):
81             for j in range(0,Bpp.shape[0]):
82                 b3[j][i-119]=Bpp[j][i]
83         cv2.imwrite(outpath+filename.decode(‘gbk‘)[2].encode(‘gbk‘)+‘_‘+‘%d‘ %(time.time()*1000)+str(random.randint(1000,9999))+‘.png‘,b3)
84
85         b4=np.zeros((Bpp.shape[0],19))
86         for i in range(139,158):
87             for j in range(0,Bpp.shape[0]):
88                 b4[j][i-139]=Bpp[j][i]
89         cv2.imwrite(outpath+filename.decode(‘gbk‘)[3].encode(‘gbk‘)+‘_‘+‘%d‘ %(time.time()*1000)+str(random.randint(1000,9999))+‘.png‘,b4)
90         #return (b1,b2,b3,b4)
调用预处理方法的代码:
1 import cv2
2 PP=PreProcess()
3 for root,dirs,files in os.walk(inpath):
4     for filename in files:
5         Img=cv2.imread(root+‘/‘+filename)#太坑,此处inpath不能包含中文路径
6         GrayImage=PP.ConvertToGray(Img,filename)
7         Bpp=PP.ConvertTo1Bpp(GrayImage,filename)
8         Bpp_new=PP.InterferLine(Bpp,filename)
9         b=PP.CutImage(Bpp_new,filename)
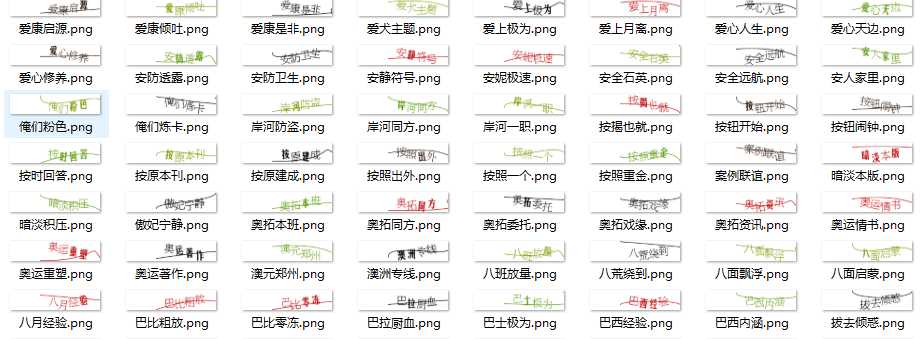
处理前的图片:
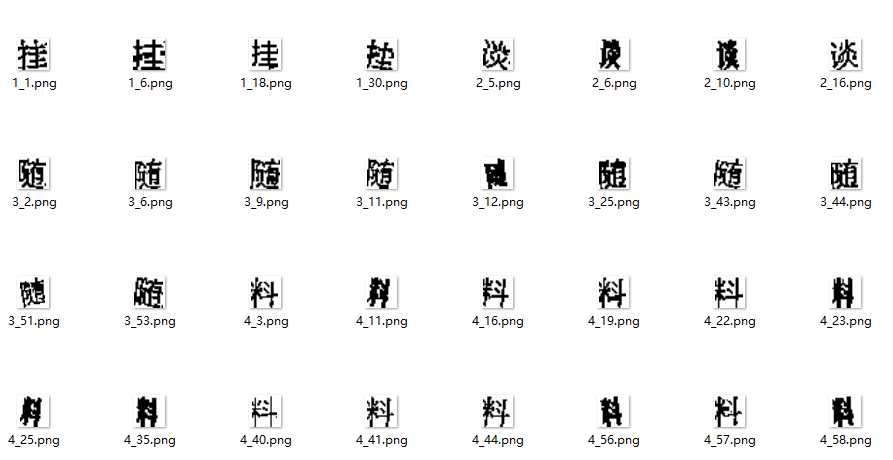
预处理后的图片:
(三)caffe模型配置
模型配置阶段,需要进行caffe所需数据格式准备、训练集和测试集准备、Lenet网络结构配置等三步
(1)训练集合测试集准备
预处理阶段将验证码切割成四个图片后,需要将每个图片进行标准化为32*32像素大小的图片,不然caffe模型无法训练。标准化完成以后就需要把每个字的图片分拆到训练集和测试集中去,这里代码就不贴了,根据个人喜好我设置一个字的训练集占80%,测试集占20%,然后把每个字用一个字典进行映射为数字编号,方便模型给出结果时我们能找到对应的汉子。
(2)caffe格式数据
为了生存caffe所需数据格式需要用到convert_imageset项目,在第一篇配置中已经编译好了这个项目,可以直接拿过来用,python调用代码如下:
    path=os.getcwd()#保存当前路径
    os.chdir("./caffe-master/caffe-master/Build/x64/Debug")#改变路径到caffe.exe文件夹
    os.system(‘SET GLOG_logtostderr=1‘)
    #生成训练集
    os.system(‘convert_imageset.exe --shuffle ./caffe-master/caffe-master/windows/CaptchaTest/dpsample/data/train  ./caffe-master/caffe-master/windows/CaptchaTest/dpsample/data/train.txt  ./caffe-master/caffe-master/windows/CaptchaTest/dpsample/data/trainldb 0‘)
    #生成测试集
    os.system(‘convert_imageset.exe --shuffle ./caffe-master/caffe-master/windows/CaptchaTest/dpsample/data/val  ./caffe-master/caffe-master/windows/CaptchaTest/dpsample/data/val.txt  ./caffe-master/caffe-master/windows/CaptchaTest/dpsample/data/testldb 0‘)
生成成功过后可以分别在训练集和测试集文件夹看到如下两个文件:data.mdb和lock.mdb格式的数据
(3)Lenet网络模型
目前Lenet结果已经非常成熟,发展到5.0版本,对于层数不需要太多的CNN网络用它完全足够了,当然现在跟强大的模型还有:Alexnet、googlenet,VGG,resnet。resnet是今年刚出的,据benchmark的测试,对于人脸识别它可以完爆其他网络,层数更是可以多达200,有兴趣的可以看看:GitHub测评项目。对于Lenet有一个可视化的配置网站:http://ethereon.github.io/netscope/#/editor,这里配置的三层结构如下:
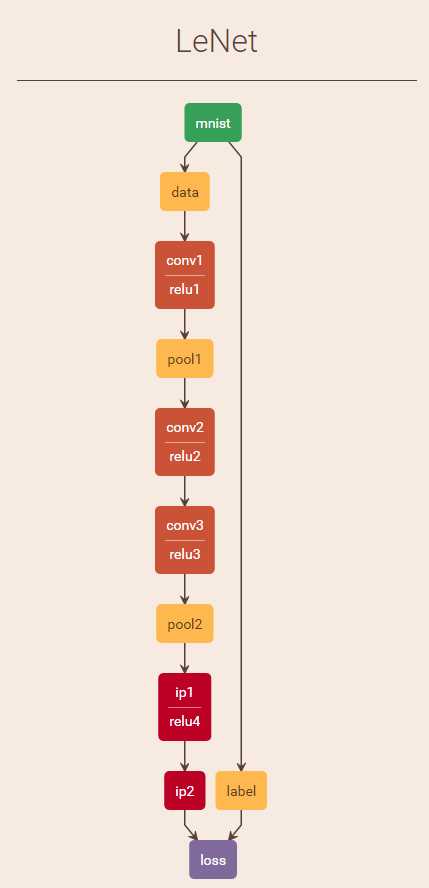
模型总共包含三个卷积层,两个池化层,模型中最重要的几个设置参数:num_output、kernel_size、stride,模型的好坏除了结构的设计外,就看这几个参数是否配置的合理,具体的配置这里不详细讲解,相关讲解文章非常的多,也有很多优秀的论文可以借鉴,模型的结构代码如下:
name: "LeNet"
layer {
  name: "mnist"
  type: "Data"
  top: "data"
  top: "label"
  include {
    phase: TRAIN
  }
  transform_param {
    scale: 0.00390625
  }
  data_param {
    source: "E:/work/meb/Deeplearning/caffe-master/caffe-master/windows/CaptchaTest/dpsample/data/trainldb"
    batch_size: 64
    backend: LMDB
  }
}
layer {
  name: "mnist"
  type: "Data"
  top: "data"
  top: "label"
  include {
    phase: TEST
  }
  transform_param {
    scale: 0.00390625
  }
  data_param {
    source: "E:/work/meb/Deeplearning/caffe-master/caffe-master/windows/CaptchaTest/dpsample/data/testldb"
    batch_size: 100
    backend: LMDB
  }
}
layer {
  name: "conv1"
  type: "Convolution"
  bottom: "data"
  top: "conv1"
  param {
    lr_mult: 1
  }
  param {
    lr_mult: 2
  }
  convolution_param {
    num_output: 64
    kernel_size: 7
    stride: 1
    weight_filler {
      type: "xavier"
    }
    bias_filler {
      type: "constant"
    }
  }
}
layer {
  name: "relu1"
  type: "ReLU"
  bottom: "conv1"
  top: "conv1"
}

layer {
  name: "pool1"
  type: "Pooling"
  bottom: "conv1"
  top: "pool1"
  pooling_param {
    pool: MAX
    kernel_size: 2
    stride: 2
  }
}
layer {
  name: "conv2"
  type: "Convolution"
  bottom: "pool1"
  top: "conv2"
  param {
    lr_mult: 1
  }
  param {
    lr_mult: 2
  }
  convolution_param {
    num_output: 256
    pad:1
    kernel_size: 6
    stride: 1
    weight_filler {
      type: "xavier"
    }
    bias_filler {
      type: "constant"
    }
  }
}
layer {
  name: "relu2"
  type: "ReLU"
  bottom: "conv2"
  top: "conv2"
}

layer {
  name: "conv3"
  type: "Convolution"
  bottom: "conv2"
  top: "conv3"
  param {
    lr_mult: 1
  }
  param {
    lr_mult: 2
  }
  convolution_param {
    num_output: 1024
    pad:1
    kernel_size: 5
    stride: 1
    weight_filler {
      type: "xavier"
    }
    bias_filler {
      type: "constant"
    }
  }
}
layer {
  name: "relu3"
  type: "ReLU"
  bottom: "conv3"
  top: "conv3"
}

layer {
  name: "pool2"
  type: "Pooling"
  bottom: "conv3"
  top: "pool2"
  pooling_param {
    pool: MAX
    kernel_size: 2
    stride: 2
  }
}
layer {
  name: "ip1"
  type: "InnerProduct"
  bottom: "pool2"
  top: "ip1"
  param {
    lr_mult: 1
  }
  param {
    lr_mult: 2
  }
  inner_product_param {
    num_output: 3666
    weight_filler {
      type: "xavier"
    }
    bias_filler {
      type: "constant"
    }
  }
}
layer {
  name: "relu4"
  type: "ReLU"
  bottom: "ip1"
  top: "ip1"
}
layer {
  name: "ip2"
  type: "InnerProduct"
  bottom: "ip1"
  top: "ip2"
  param {
    lr_mult: 1
  }
  param {
    lr_mult: 2
  }
  inner_product_param {
    num_output: 3666
    weight_filler {
      type: "xavier"
    }
    bias_filler {
      type: "constant"
    }
  }
}
layer {
  name: "accuracy"
  type: "Accuracy"
  bottom: "ip2"
  bottom: "label"
  top: "accuracy"
  include {
    phase: TEST
  }
}
layer {
  name: "loss"
  type: "SoftmaxWithLoss"
  bottom: "ip2"
  bottom: "label"
  top: "loss"
}
(四)训练模型
到目前为止,准备工作都做完了,现在就可以利用python import caffe进行模型训练了,模型训练速度快慢主要看你GPU的配置如何,我开始用的GTX650,训练5000轮下来,就得消耗半天时间,后台实在无法忍受这个速度,就买了一个GTX1080,那速度简直没法比,训练5000轮半个小时就能完成。调用模型的代码如下:
    cmd=‘caffe.exe train -solver=./caffe-master/caffe-master/windows/CaptchaTest/dpsample/solver/lenet_solver.prototxt‘#训练语句
    os.system(cmd)
    os.chdir(path)
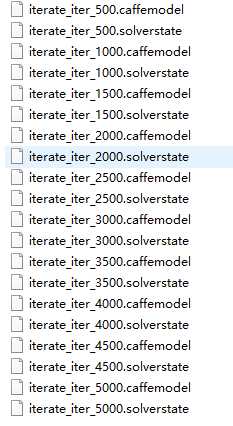
模型训练中主要的输出参数有:loss,accuracy,如果你看到loss一直在收敛,每500轮输出一次的准确率也在提高,那么说明你的模型设计没什么问题,不然就得重新设计。训练完成后就能得到如下模型:
(五)使用模型
模型训练完成后,我们就可以简单的用测试图片进行测试,测试代码如下:
    #调用模型
    deploy=‘.\dpsample\solver\lenet_deploy.prototxt‘    #deploy文件
    caffe_model=‘.\dpsample\iterate_iter_5000.caffemodel‘   #训练好的 caffemodel
    imgtest=‘./dpsample/data/val/685_363.png‘    #随机找的一张待测图片

    net = caffe.Net(deploy, caffe_model, caffe.TEST)
    transformer = caffe.io.Transformer({‘data‘: net.blobs[‘data‘].data.shape})  #设定图片的shape格式(1,3,32,32)
    transformer.set_transpose(‘data‘, (2,0,1))    #改变维度的顺序,由原始图片(28,28,3)变为(3,28,28)
    #transformer.set_mean(‘data‘, np.load(mean_file).mean(1).mean(1))    #减去均值,前面训练模型时没有减均值,这儿就不用
    #transformer.set_raw_scale(‘data‘, 1)    # 缩放到【0,1】之间    已经在网络里设置scale,这里可以不用
    transformer.set_channel_swap(‘data‘, (2,1,0))   #交换通道,将图片由RGB变为BGR
    im=caffe.io.load_image(imgtest)                   #加载图片
    net.blobs[‘data‘].data[...] = transformer.preprocess(‘data‘,im)       #执行上面设置的图片预处理操作,并将图片载入到blob中
    out = net.forward()
    prob= net.blobs[‘prob‘].data[0].flatten() #取出最后一层(Softmax)属于某个类别的概率值,并打印
    print prob
    order=prob.argsort()[-1]
    print(order)
最后输出的order就是模型预测出最有可能文字的序号,再到文字和标号对应的字典中去查看就知道这里的识别对不对了!
#写在最后# 我是一个忠实的VS用户,所有代码都在VS编辑器实现的,要能用python,需要安装一个PTVS插件,在这里编辑python代码需要非常注意中文编码的处理,否则你会吃大苦头,不过相信我其他编辑器能搞定的VS也一定没问题,只是你要有足够的耐心,遇到问题的时候多思考多搜搜问题的本质所在。
原创性声明:
本人在cnblogs上的ID为marso,博客地址为http://www.cnblogs.com/marso/,所有包含原创声明的博客均为本人原创作品。博客的内容除已注明的引用文献外均为本人独立研究成果。除特殊注明外均采用 知识共享 署名-非商业性使用-相同方式共享 3.0 中国大陆 许可协议进行许可。
作品及其衍生品不得未经许可而用于商业用途。个人使用无需许可,但必须在引用部分(代码,基本思想或实现方案等)标示出原作者信息,发布时需附带本声明。(对于GPLv3下发布的作品,引用本人作品不需要许可,也不需要标示出引用部分或附带声明。)
关于“原创”的说明:文章发布前我会进行初步的相关搜索,如未发现有别人发表过类似内容的作品我才会发表。但是因为可能有遗漏,所以不能保证我的博客内容一定为“首创”,但一定可以保证“原创”。
欢迎转载,并请注明以下内容:
转载自博客园http://www.cnblogs.com/marso/的Blog, 博客地址为http://%博客URL%,采用 知识共享 署名-非商业性使用-相同方式共享 3.0 中国大陆 许可协议 进行许可。其中“%博客URL%”替换为被转载博客的实际URL。